:fill(white)/https://www.toppstiles.co.uk/static/cms/media/Shower-panels.png)
:fill(white)/https://www.toppstiles.co.uk/static/cms/media/Porcelain-Splashback-Desktop.jpg)
:fill(white)/https://www.toppstiles.co.uk/static/cms/media/Untitled-design%20(87).png)
:fill(white)/https://www.toppstiles.co.uk/static/cms/media/Everscape-Enis-Black.webp)
:fill(white)/https://www.toppstiles.co.uk/static/cms/media/Outdoor-Trim-3.webp)
:fill(white)/https://www.toppstiles.co.uk/static/cms/media/Pronto-New.jpg)
:fill(white)/https://www.toppstiles.co.uk/static/cms/media/STN-AMB-CRISP-BEIGE-PUL-60X120CRIPS-XL-BEIGE-PUL-60X120.jpg)
:fill(white)/https://www.toppstiles.co.uk/static/cms/media/XL-Suction%20Cup.jpg)
:fill(white)/https://www.toppstiles.co.uk/static/cms/media/Knowledge-Base%20LVT.webp)
:fill(white)/https://www.toppstiles.co.uk/static/cms/media/Engineered-wood-herringbone-flooring.jpg)
:fill(white)/https://www.toppstiles.co.uk/static/cms/media/Knowledge-Base%20Laminate.webp)
:fill(white)/https://www.toppstiles.co.uk/static/cms/media/Bedding_Wood_wall_panels.jpg)
:fill(white)/https://www.toppstiles.co.uk/static/cms/media/758918.jpg)
:fill(white)/https://www.toppstiles.co.uk/static/cms/media/Bathroom-Panel.jpg)
:fill(white)/https://www.toppstiles.co.uk/static/cms/media/Glass-splashbacks-2.png)
:fill(white)/https://www.toppstiles.co.uk/static/cms/media/Aluminium-Splashback-Image.png)
:fill(white)/https://www.toppstiles.co.uk/static/cms/media/black-10mm-trim-matt.jpg)
:fill(white)/https://www.toppstiles.co.uk/static/cms/media/Knowledge-Base%20Wood%20Panel.webp)
:fill(white)/https://www.toppstiles.co.uk/static/cms/media/Knowledge-Base%20Shower%20Panel.webp)
:fill(white)/https://www.toppstiles.co.uk/static/cms/media/Aluminium-splashback.jpg)
:fill(white)/https://www.toppstiles.co.uk/static/cms/media/Aries-Beige.jpg)
Trending Now
:fill(white)/https://www.toppstiles.co.uk/static/cms/media/757314;757316-1.jpg)
:fill(white)/https://www.toppstiles.co.uk/static/cms/media/outdoor-tiles-1.png)
:fill(white)/https://www.toppstiles.co.uk/static/cms/media/GTLFL-Quick%20Search.png)
Back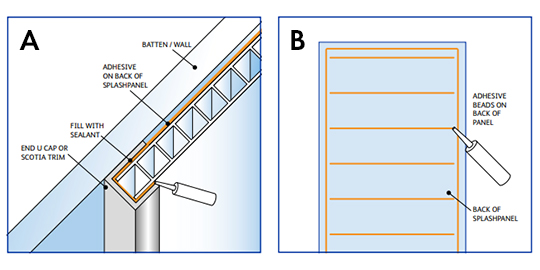
 Start by attaching an end cap to the wall’s starting point, fix or adhere it to the wall/batten and apply a full length, unbroken, bead of PVC silicone sealant into the channel of the end cap.
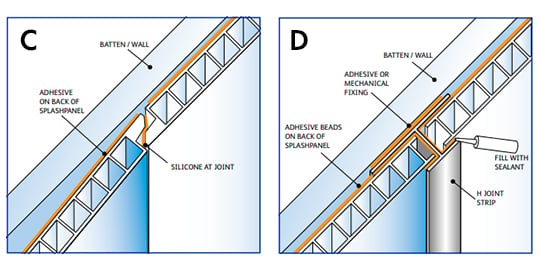
Then apply a continuous thick bead of adhesive around the periphery edge of the wall panel (approx. 50mm in from the panel edge), followed by further horizontal beads of adhesive spaced 450mm apart on the panel’s back.
Angle the panel edge fully into the end cap and firmly attach the panel onto the wall, ensuring it makes full contact. Where a timber batten has been used, apply the beads of adhesive to the battens instead of the back of the panel and then fix firmly at the points of the battens.
Apply the same adhesive lines to the next panel/battens, ensuring to apply a small silicone bead along the upper section of the panel tongue of the next panel. Position the panel vertically and insert the tongue of the panel into the groove of the previously installed panel. Wipe any excess silicone off the panel joint immediately.
At wall corners, either use the internal or external trims, ensuring a full silicone bead is applied into the trim recesses prior to fixing the trim in place and inserting the panels into place.
To complete the panelling, repeat the first step by applying an end cap to the outer edge.
Looking for help installing shower panels around a bath? Read our dedicated guide for step-by-step advice and tips.
How To Fit PVC Bathroom Wall Panels
Share
:fill(white)/https://www.toppstiles.co.uk/static/cms/media/Splashpanel_white-sparkle.jpg)
What Are PVC Bathroom Wall Panels?
PVC wall panels are made from extruded PVC, which has a corrugated structure, making it much lighter than other composite panels. Shower wall panels that are made of PVC are completely waterproof; they simply require a bead of silicone at all joints to ensure they remain watertight. PVC bathroom wall panels are easy to clean with a non-abrasive antibacterial cleaner; simply wipe them over with a soft cloth.
What Tools Will I Need?
As the panels can be DIY’d, no specialist equipment is required. You will need:
- Fine tooth saw or utility knife (for cutting your panels to size)
- Gloves and eye protection
- Straight Edge and tape measure
- PVC panel adhesive, silicone sealant and antibacterial cleaner
- If you need to use a batten system then you will also need a drill for mechanical fixing to your walls.
Handling Your PVC Shower Panels
- Check all your panels before installation begins, ensure there is no damage, and that they are the same size and batch number for an acceptable colour match.
- PVC panelling should not be stored vertically, leaned against any walls or objects, as this may induce bowing. They should be stored on a flat, dry surface within a normal heated environment.
- When lifting, it is recommended that 2 persons lift the panels, taking appropriate safety measures.
- Each panel (with packaging) weighs approximately 11KG.
How To Prepare Your Walls For Fitting Wall Panels
Designed for internal walls, the PVC shower panels are fixed with PVC panel adhesive and therefore the wall substrate must be sound, clean, dust free, dry, plumb and even. Any paints, sealers or coatings of any kind on the intended installation surface must be checked for soundness and adhesion suitability and, if in doubt, should be removed before the adhesive is applied.
PVC Panels can be adhered directly onto flat, plumb, sound and smooth walls however if the surface is uneven a timber batten frame system will need to be installed first for the panels to sit flush against.
Where any items such as sink basins, toilet cisterns, shower units etc. are to be fixed through the panels, install support battens into the framing system to support and fix these items to.
How To Fix PVC Wall Panels
Start by attaching an end cap to the wall’s starting point, fix or adhere it to the wall/batten and apply a full length, unbroken, bead of PVC silicone sealant into the channel of the end cap.
Then apply a continuous thick bead of adhesive around the periphery edge of the wall panel (approx. 50mm in from the panel edge), followed by further horizontal beads of adhesive spaced 450mm apart on the panel’s back.
Angle the panel edge fully into the end cap and firmly attach the panel onto the wall, ensuring it makes full contact. Where a timber batten has been used, apply the beads of adhesive to the battens instead of the back of the panel and then fix firmly at the points of the battens.
Apply the same adhesive lines to the next panel/battens, ensuring to apply a small silicone bead along the upper section of the panel tongue of the next panel. Position the panel vertically and insert the tongue of the panel into the groove of the previously installed panel. Wipe any excess silicone off the panel joint immediately.
At wall corners, either use the internal or external trims, ensuring a full silicone bead is applied into the trim recesses prior to fixing the trim in place and inserting the panels into place.
To complete the panelling, repeat the first step by applying an end cap to the outer edge.
Looking for help installing shower panels around a bath? Read our dedicated guide for step-by-step advice and tips.
How To Cut PVC Shower Panels
PVC panels should be cut using a fine-tooth blade handsaw, the decorative side of the panel facing upwards.
After Care For PVC Shower Panels
The panels cannot be used in temperatures of more than 60 degrees Celsius, higher temperatures will most likely cause damage to the surface finish.
The panels have an element of resistance to both artificial and natural UV light however, if placed in direct sunlight for long periods of time the panel finish is likely to fade over time. It’s therefore recommended to install blinds or curtains to reduce direct natural light on the panels.
For ongoing maintenance, the panels require very little, use a non-abrasive antibacterial cleaner with a soft cloth to wipe down the surface. Do not use any abrasive scourers, abrasive agents or bleaches as these will damage the panel surface.
Finally, ensure all the silicone is kept in good condition, replace any parts that break up over time, this is key to ensuring your panels remain watertight.
You can shop the full range of PVC tiles, essentials and accessories online now.
How To Fit PVC Bathroom Wall Panels